Sunday, October 22, 2006
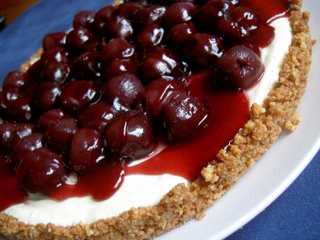
Luscious Cherry Cheesecake
This is a cheesecake that I used to make all the time years back, the recipe comes from The Australian Lifestyle Cookbook, a book my mum gave to me for my 21st birthday, it is a giant of a book & I haven’t pulled it out in years. Now that I have made this old favourite again will take a look & see what else I can try out. Just from reading the ingredients you can probably already taste how beautiful this cake is, lovely & rich & creamy with a nice tang from the cherries on top, way back when it was made all the time everyone adored it. Quick tip, it is best to start this cake a couple of days ahead, ie I made the crust Friday night so it was nice & chilled ready for the filling on Saturday which needs 24 hours before putting on the topping. It may sound like a chore but it actually makes it easier as you just do a bit here & there instead of one big job, just needs some prior planning.
Cherry Cheesecake
Base
180g plain sweet biscuits (I always use butternut snaps), crumbed
pinch cinnamon or nutmeg
60g butter, melted
Combine ingredients and mix well together. Press into a 20cm foil lined pie plate to form a crust. Refrigerate.
Filling
250g cream cheese
400g can condensed milk
1/3 cup lemon juice
1 teaspoon gelatine dissolved in 1 tablespoon hot water
Beat cream cheese until soft. Gradually beat in condensed milk, lemon juice & dissolved gelatine and mix well. (Use ripe lemons as green lemons may prevent a firm set). Pour mixture into chilled crust and refrigerate at least 24 hours
Topping
450g can cherries, drained, syrup reserved
1 tablespoon brandy
1 ½ tablespoons arrowroot
red food colouring, optional (I never use this)
Arrange drained cherries over top of cake. Bring syrup to the boil. Blend together arrowroot & brandy then add to boiling syrup, stirring continuously until thickened. Add a few drops of red food colouring if desired. Spoon carefully over cherries, chill.
Couscous with grilled summer vegetables & loadsa herbs
The salads for the bbq were a simple green salad, a capri salad with some lovely fresh buffalo mozzarella that I bought from the local deli, personally I was very excited about this as I’ve never been able to find it before to buy & have only tasted it once & it was divine, thank God for the deli at Barkly square, they have promised to keeping selling it & add abt $55.00 per kilo (from what I remember) 2 balls cost me about $12 so not cheap but well worth it I think. I also made this couscous salad from Jamie Oliver’s Return of the Naked Chef. This is a great salad, full of fresh veggies, the roasting & grilling flavours really stand out & the dressing & herbs pull it all together nicely without being overpowering
Couscous with grilled summer vegetables & loadsa herbs
250g couscous
285ml/ ½ pint cold water
3 red capsicum
1 handful asparagus, trimmed
2 or 3 small firm zucchinis, sliced
1 small bunch spring onions, trimmed & finely sliced
3 good handfuls of mixed fresh herbs (basil, coriander, mint, parsley)
2 x olive oil & lemon juice dressing
salt & freshly ground pepper
red wine vinegar
Place the couscous in a bowl with the cold water. Blacken the capsicum either over a naked flame (if you have one on your stove top) or under the grill. When blackened, place in a sandwich bag, wrap in glad wrap or cover in a bowl for 5 mins until cool. Remove the skins & seeds & roughly chop.
On a very hot griddle pan, lightly char the asparagus & zucchini on both sides then toss in the bowl with the couscous & add the capsicum, spring onions, chillies & ripped up herbs. Mix well. Add the dressing & toss well. Season to taste with salt & pepper & a dash of red wine vinegar,
Olive Oil & lemon juice dressing
2 tablespoons lemon juice
5 tablespoons olive oil
salt & freshly ground black pepper
Spiced Mazatlan Meatballs
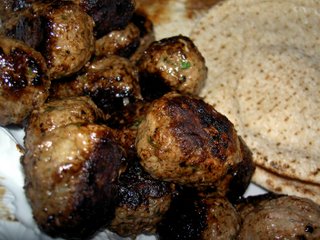
For the main (meat plus!) course of tonight’s bbq, alongside the steaks, chops & various snags I made these from Ainsley’s Ultimate Barbecue Bible, for something different. The are little Middle Eastern flavoured meatballs, they were mega easy to prepare, basically you just chuck everything into the food processor & then roll into balls. We cooked these & served them while the rest of the meat was cooking, great idea to start the main course, they went down very well & not too filling as to spoil your appetite for the rest of the feast
Spiced Mazatlan Meatballs
500g Lean minced lamb
pinch of salt
I onion, finely chopped
2 teaspoons ground cumin
1 teaspoon ground allspice
¼ teaspoon cayenne pepper
4 tablespoons roughly chopped fresh coriander
To serve
4 Middle Eastern flatbreads
1 red onion, thinly sliced
200g Greek yoghurt
1 lemon, cur into wedges
Place the lamb, salt, onion. spices & coriander in a food processor and whiz until well blended. Using wet hands, shape the mixture into 20 meatballs & cook over hot coals or in a non stick frypan for 10 minutes, turning frequently until well browned.
Warm the flatbreads for 1-2 minutes on each side until softened & warmed through.
Serve the flatbread with onion scattered over, a dollop of yoghurt, meatballs & roll up.
Griddled Eggplant with fetta, mint & chilli
Today I’m having Michaels family over for a bbq & to start with I thought I would try out these little morsels from Nigella Lawson’s Forever Summer that I have heard so many good things about.
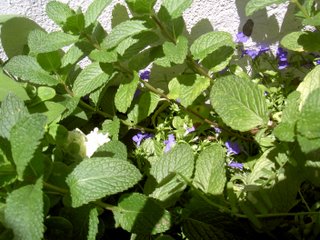
The recipe calls for a large bunch of fresh mint which luckily I have growing in my courtyard no thanks to me. It initially grew on it’s own & every year I cut it back as it tries to take over the garden & just keep a little patch to use for cooking. I love the fact that I can just pop out the back door to take a cutting whenever I need, and Mint is so versatile, it can be used in sweet, savoury & even drink recipes, you gotta love it. You can see in the picture how it’s growing very heartily amongst my lobelia against the back wall! So this recipe is my entry this weekend for Weekend Herb Blogging, hosted by Pat at Up a Creek without a Patl this round.
I have to say these are absolutely yummy, I could have eaten them all if it wasn't for the fact that I had a mamoth bbq waiting for me. The strong taste of the eggplant went really well with the salty, creamy cheese & the mint & chilli just set the whole thing off, really easy to prepare too. One hint too, I was very cautious with the filling & eneded up hacing some leftover so stuff them full.
Griddled Eggplant with fetta, mint & chilli
2 large eggplants, each cut thinly. Lengthways, into about 10 slices
4 tablespoons olive oil
250g fetta cheese
1 large red chilli, finely chopped, deseeded or not, depending on how much heat you want
Large bunch fresh mint, finely chopped, with some saved for sprinkling over at the end
Juice of 1 lemon
Black pepper
Preheat the barbecue or griddle to a high heat
Brush both sides of the eggplant slices with the oil, and cook them for about 2 minutes each side until golden & tender
Crumble the fetta into a bowl & stir in the chilli, mint & lemon juice and grind in some black pepper. Pile the end third of each slice with a heaped teaspoon of the mixture & roll each slice up as you go to form a soft, stuffed bundle.
Place joint side down on a plate & sprinkle with a little more mint.
Makes 20 rolls
Wednesday, October 18, 2006
Sweet & Sour Pork
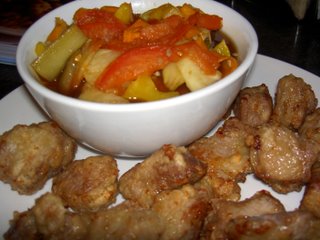
Last week I made this dish from Kylie Kwong’s Simple Chinese Cooking. The sauce was absolutely fantastic, the fresh ingredients work a treat & the flavours were beautiful, fresh & delicate. On the pork however I need some practice, I have no clue how to deep fry! I suspect I didn’t heat my oil high enough before I started so the end result was still tasty but not crisp, golden & luscious as promised. It’s funny you would think that deep frying would be the easiest cooking method of all but because I have always steered away from it, you know, too much fat, etc, I am way behind on this technique. Anyway the flavours were there & lots more recipes to perfect my technique on yet!
Sweet and Sour Pork
1 ½ tablespoons cornflour
1 tablespoon cold water
2 x 300g pork neck fillets, cut in half lengthways and then into bite sized pieces on the diagonal
2 egg yolks, lightly beaten
3 teaspoons light soy sauce
2 teaspoons sesame oil
1 teaspoon sea salt
¼ cup plain flour
¼ cup cornflour
vegetable oil, for deep frying
Sweet and Sour Sauce
¼ small ripe pineapple, peeled
1 small carrot, peeled
1 small cucumber, peeled
¾ cup malt vinegar
5 tablespoons shao hsing wine or dry sherry
½ cup white sugar
1 teaspoons seal salt, extra
4 garlic cloves, crushed
2 tablespoons ginger, julienne
½ medium sized yellow pepper, julienned
2 small tomatoes, finely sliced
2 tablespoons light soy sauce
Blend cornflour with water in a bowl until dissolved. Add pork, egg yolks, soy sauce, sesame oil & salt and mix well. Cover & leave to marinate in the fridge overnight.
To make the sauce, remove core from pineapple & finely slice into pieces. Using a vegetable peeler, finely slice carrot lengthways into ribbons. Cut cucumber in half, slice on the diagonal & set aside, together with carrot & pineapple.
Place vinegar, wine or sherry, sugar & extra salt in a medium heavy-based saucepan & stir over high heat until sugar dissolves. Bring to the boil, add garlic, ginger, reduce heat & simmer, uncovered for 10 minutes. Add pineapple, carrot, cucumber, pepper & tomato & simmer for a further 3 minutes or until pineapple is tender & tomato has broken down slightly. Stir in soy sauce, remove from stove & set aside.
Combine plain flour & extra cornflour. Add the pork & mix well. Heat vegetable oil in a hot wok until surface seems to shimmer slightly. Deep fry pork in batches over high heat for 1 minute, then reduce heat to medium & fry for another 2 minutes, or until pork is almost cooked through. Remove & drain on absorbent paper. Gently reheat sauce. Return all pork to the hot wok & deep fry for a further 3 minutes, or until lightly browned, crispy & cooked through. Remove & drain well on paper. Serve with sauce.
Sunday, October 15, 2006
White Chocolate & Berry Muffins
When I saw these luscious sounding muffins on Exclusively Food, I knew I just had to make them soon. I used strawberries as they were readily available, next time would like to try with either raspberries or blueberries or combinations of all 3. They were absolutlely delicious straight out of the oven. However I must warn you I spooned the batter straight into a greased muffin tin instead of lining with patty cases & when I tried to tip them out there was a bit of a mess, ie breakage. Luckily not all of them fell apart & I quickly prised the rest out carefully with a knife, so I think I would go the cases next time. Absolutely drool worthy as promised.
White Chocolate & Berry Muffins
Fresh or frozen berries can be used. If using frozen berries, add them to the mixture while they are still frozen.
Makes 12 muffins.
320g (2 cups) self-raising flour
148g (2/3 cup) caster sugar
1 cup chopped white chocolate
2 teaspoons lemon juice
250ml (1 cup) milk
125ml (1/2 cup) mild vegetable oil
1 large egg
200g berries
Preheat oven to 170 degrees Celsius (fan forced). Line a muffin tray with 12 muffin cases.Mix self-raising flour, caster sugar and white chocolate together in large bowl.Whisk lemon juice, milk, oil and egg in a medium bowl until combined. Gently stir in berries.Gently stir wet ingredients into dry ingredients. Stop stirring once the ingredients are combined (do not over mix). The batter should be quite wet.Spoon mixture into muffin cases. Bake for 22 to 25 minutes. To check whether muffins are cooked, press lightly on the centre of a muffin; if it springs back, it's ready.
Serve muffins warm or at room temperature, dusted with icing sugar. Muffins can be reheated in the microwave. They are best eaten on the day they are baked.
Labels:
berries,
blueberries,
Chocolate,
icing,
lemon,
muffins,
raspberry,
strawberry,
vegetable,
White chocolate
Saturday, October 14, 2006
Pasta al Forno Con Pomodori e mozzarella (Baked pasta with tomatoes and mozzarella)
For a quick & easy pasta dish I made this baked pasta from Jamie Oliver’s Italy cookbook. It’s very traditional & nothing new, just good simple delicious pasta, who doesn’t love pasta with loads of tomatoey sauce & oozy melty cheese. And the best bit is heaps of leftovers to freeze for mid week when I don’t have the time or energy these days to cook most nights. Jamie’s recipe also gives the option of using fresh tomatoes whichI have omitted as that makes it too much hard work! His recipe also says to process the sauce but I went the rustic option & left lumpy, as I said I needed something very, very easy.
Pasta al Forno Con Pomodori e mozzarella (Baked pasta with tomatoes and mozzarella)
Sea salt & freshly ground black pepper
Extra Virgin Olive Oil
1 white onion, peeled & finely chopped
2 cloves of garlic, peeled & finely sliced
1 or 2 dried red chillies, crumbled
3 x 400g tins plum tomatoes
a large handful of fresh basil leaves
I tablespoon red wine vinegar
400g dried orecchiette
4 big handfuls of freshly grated parmesan cheese
3 x 150g balls of mozzarella, sliced
Preheat your oven to 200c & put a large pot of salted water on to boil. To a large pan add a couple of glugs of olive oil & fry the onion, garlic & chilli slowly for about 10 minutes until softened but not browned. Add the tomatoes & a small glass of water, bring to the boil & simmer for about 20 minutes. Tear the basil leaves & add along with the red wine vinegar & salt & pepper to taste. Meanwhile cook your pasta according to packet instructions & drain.
Add half the sauce & a handful of parmesan to the drained pasta & toss. Then rub a large baking dish with a little olive oil & layer a little pasta in the bottom, top with sauce, parmesan & mozzarella slices, then repeat layers until all ingredients used up, finish off with a good layer of cheese. Bake in the oven for 15 minutes until golden & bubbling.
Apple & Pine Nut Cake (Torta di Mele e Pinoli)
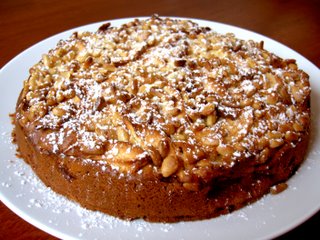
Today I made this cake from Australian Table July 2006, to take over to a friends house for brunch. I peeled my apples as they were a bit old & didn’t know how the skin would go in this state. The cake was very unusual, the pine nuts gave a very interesting flavour, the apples of course made it nice & fruity. A good cake if you don’t feel like anything overly rich or sweet.
Apple & Pine Nut Cake (Torta di Mele e Pinoli)
1 cup plain flour
1 teaspoon baking powder
½ cup caster sugar
2 large eggs, lightly beaten
125g unsalted butter, melted
4 medium unpeeled golden delicious apples, cored & thinly sliced
¾ cup pine nuts
grated rind of 1 lemon
icing sugar, to dust
Mascarpone, to serve
Preheat oven to 180c. Lightly grease a 20cm springform tin & dust with flour.
Sift flour & Baking powder together into a bowl. Stir in sugar. Make a well in centre & add beaten egg & melted butter. Stir, gradually incorporating flour to make a thick batter.
Fold in ¾ of sliced apple & ½ cup of pine nuts & lemon rind. Spoon into prepared pan. Arrange remaining apple on top of cake & sprinkle with remaining nuts. Bake for 1 hour and 5 minutes, cover with foil if browning too much, until a skewer inserted comes out clean.
Cool cake in pan for 10 minutes before transferring to a serving platter to cool completely. Dust with icing sugar & serve with mascarpone.
Satay Anika Malaysian Restaurant, East Brunswick
Last night Michael & I didn’t have much on & with footy season finally over I wa s able to drag him out of the house away from the tv screen. We didn’t feel like dong much of anything so just went for a walk down Lygon Street (East Brunswick end) to one of my favourite local restaurants.
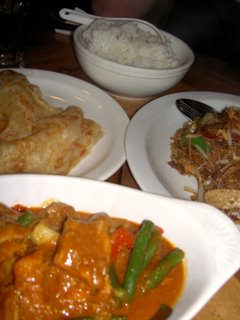
Satay Anika is a great place for a quick, cheap & really good Malaysian feed. Its byo too which is nice sometimes, so armed with a bottle of Montalto Pinot Grigio – which I am quite partial to even though I have to severely limit my intake these days, we stepped inside, another great thing about the place – you don’t need a booking & can walk in off the street (or I have never needed one yet anyway).
The place is tiny with 2 areas, up & downstairs – have never made it upstairs myself. Nothing fancy about the décor but who needs it when the food is so good? The staff also are very friendly & attentive. Apparently the place is famous for its satays which sadly I have never tried as Michael is allergic to peanuts – something I am constantly frustrated by when cooking! One of these days I will bite the bullet & just order some for myself to try. Anyway this said we started off with some veggie curry puffs which were delicious. We then moved onto a traditional Malaysian chicken curry cooked in coconut milk, a Malaysian Noodle dish, some rice & of course Rotti to mop up the gorgeous curry sauce. The noodles were good but the curry beats it all, I love this stuff & have vowed next time to order curry & curry alone so I can have the whole dish to myself, it really is fantastic. With the bill coming it at $30.00 suggest you get down thre & try it out for yourself!
Satay Anika
140 Lygon Street
East Brunswick
9380 9702
Tuesday, October 10, 2006
Orange Cake
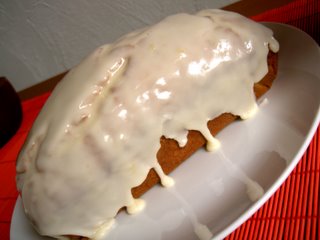
Yesterday I made this simple yet tasty cake from the latest Spring edition of Donna Hay magazine. Once again I didn’t read the recipe properly, I think this pregnancy thing is screwing with my mind! I only saw the orange zest & not the orange rind so the orange flavouring was a little light, still tasted good though & very quick to throw together though reminder to self – check recipe first & put butter out to soften well before you need to beat it – I seem to forget this every single time I’m baking a cake.
Orange Cake
15g unsalted butter, softened3/4 cup caster sugar
2 eggs, lightly beaten
1 ½ cups plain flour, sifted
1 ¼ teaspoons baking powder, sifted
1 tablespoon milk
2 tablespoons finely grated orange rind
4 tablespoons orange juice
1 tablespoon orange zest
Orange icing
1 ¼ cp icing sugar, sifted
2 tablespoons orange juice
Preheat oven to 170c. Place the butter & sugar in a bowl of an electric mixer & beat for 8-10 minutes or until light & creamy. Gradually add the eggs & beat well. Add the flour & baking powder & mix well. Add the milk, orange rind & juice & mix until smooth. Spoon the mixture into an 18 x 8 cm loaf tin lined with baking paper & bake for 5 minutes or until cooked when tested with a skewer. Cool on a wire rack.
To make the icing, combine sugar & juice in a bowl & mix to form a smooth paste. Use a palette knife to spread the icing over the cake & serve topped with orange zest.
Sunday, October 08, 2006
Fifteen Melbourne - Finally a look in!
A couple of weeks ago when I heard that Fifteen was opening for reservations I suggested to Michael that it would be great if he could get us a booking there, you know a nice surprise seeing as how I'm normally the one doing all of the organising for the 2 of us. I thought the booking line might be a bit busy but had no idea that within a matter of days they would be booked solid until the end of January next year, amazing what a tv show can do for you. Anyway Michael being the fantastic hubbie that he is, got on the line & waited for 1.5 hours (on speaker phone while he was working so it was bearable!) & got us a booking for a Saturday night no less, very impressive.
There have been a lot mof mixed feelings out there about Fifteen so I was quite curious to see exactly what it would be like. I love the idea of what Fifteen stands for, helping those in need but at the same time providing us with a (hopefully) great experience in oder to achieve that goal. At the same time I think that for $90.00 a head for the 6 course tasting menu which is your only option for dinner, the food has to be bloody good & stand up to other great Melbourne restaurants.
I had very high expectactions for the food, a few months ago I did a Queen Vic Market cooking night with Tobi Puttock & the food was to die for so I was hoping for more of the same.
Ok so now down to last night. On the decor, I loved it & it was totally different to the 'artist impressions' as seen on tv. The colorful bar area which Jamie knocked looked great & the colors were much more toned down, oranges, reds, very warm & filled with wine very subtle too. The place is split into 3 areas, the private dining room which I spied a corner of, looked very dark & gothic from what I could see, would be nice having a private party there with some friends, I believe it seats 10. Then onto the main area, on entering you walk down some stairs where you can see straight into the kitchen, then around the corner the bar area with more casual looking dining area in front, light wooden seats & tables, etc. this is split down the middle where you go into the second dining area which is where we were seated. I loved this area, all dark wood furniture, dark wood floors, black walls & ceilings, a purplish couch forming the back seat for the tables on the side & back walls & long mirrors along the walls too & some very funky globe light fittings hanging here & there. Ask Michael, I love black & the trend seems to be now to have everything all nice & light so this darkess worked well for me.
Now onto the food, as mentioned it is a six course set menu, soup, seafood, pasta, main, dessert & cheese platter with a choice of 2 dishes offered for the pasta & main course.
First course was Borlotti bean & pasta soup with fresh grated parmesan & Fifteen olive oil.
This was really nice, though needed a bit of salt, luckily there was a dish of Pink Murray River salt flakes on each table - nice touch - which did the job. As you can see it was a very thick, hearty, warm & homey soup which I would love to replicate at home.
Next was fried whitebait, sage salt, lemon & aioli.
As you can see a very small serve but dont be put off, by the end of the night we were well satisified & if the courses were any biggger we would have struggled to fit them in. The fish was cooked perfectly, nice & light & the salt/aioli combo went very well with it.
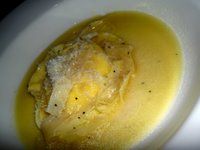
For the Pasta course I opted for the Fifteen ravioli with biodynamic riccotta, free-range egg yolk, served with white asparagus & butter broth.
Yummo, nothing beats home made pasta & the runy egg filling was quite unusual, quite a big ravioli too as you can see. Michael went for the Risotto of calamari, squid ink, celery, chilli & fifteen olive oil which he reallay enjoyed too.
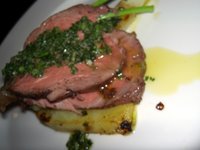
For the main we both had the Slow roast Bachus Marsh grass fed beef, Nicola potato & fennel al forno, braised greens & salsa verde. The other choice was Tasmanian Salmon. The beef dish smelled divine which I think was mainly due to the whole clove of roast garlic hidden amongst the greens which I happily devoured. The beef was very tasty though mine was a bit on the cold side which is obviously a bit dissapointing. Mine pictured was cooked a little extra as I'm not supposed to be eating any raw or underdone meat at the moment, Michaels was as per the menu & pretty bloody which is a good thing, nothing worse than an overdone piece of cow.
Dessert was Vialono Nano Tiramasu, little twist on the traditional with crostoli.
The twist was rice instead of sponge/biscuits in the tiramasu, I have to say that this & the crostoli were fantastic & by far by favourite course of the night.
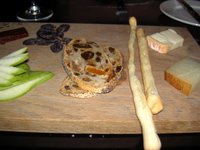
Lastly, the cheese course. pear, quince paste, muscatels, grissinei, some fruit bread & of course the cheeses, sorry have forgotten what they were except tto say that one was lovely & oozy & the other was as bitey spanish crumbly one, both fantastic, in fact the whole cheese course was really great.
Overall the whole experince was enjoyable, the staff were very friendly & helpful, extensive wine list to choose from, fast servce though not too fast that you had no time between courses & the food was good, presentation & tatse. For 2 weeks of opening & a bunch of kids that a couple of months ago had no idea it is pretty amazing to see how far they have come though I would like to see them improve some more & lift the food from being just pretty good to being fabulous!
Fifteen Melbourne
115-117 Collins Street
Melbourne
1300 799 415 www.fifteenmelbourne.com.au
Wednesday, October 04, 2006
Pink-Eye potato, olive and Caper Salad
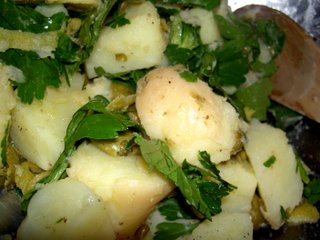
Being of both Polish & Lithuanian background I am a very big fan of the humble potato & am always looking for new ways to dress it. I love anything from a simple mash, a hearty baked spud jammed packed with tasty fillings, crispy roast ones & of course a great potato salad. My all time favourite potato salad is the family recipe which I have eaten my whole life, its pretty much boiled potatoes, peeled, mixed with chopped onion, boiled eggs, tons of mayo & some salt & pepper, very simple yet very tasty. Occasionally however I do like to try something different so the other night I tried Ben O’Donoghue’s take on the dish from the surfing the menu cook book of series 1. It was great, the olives & capers added a nice zing to the dish. Very repeatable, we served it alongside a good steak for a quick & simple meal.
Pink-Eye Potato, Olive and Caper Salad
1kg pink eye potatoes
½ garlic clove
salt
2 tablespoons coarsely chopped flat leaf parsley
100g baby capers
200g pitted large green olives
2 tablespoons white wine vinegar
100ml extra virgin olive oil
freshly ground pepper
finely peeled zest of 1 lemon
2 tablespoons white celery leaves
Place the potatoes in a large pan & cover with cold water. Add salt, bring to the boil & simmer until tender, about 20 minutes depending on the size. In a large mortar smash the garlic with a little sea salt, then add the parsley & roughly smash. Add the capers & olives and do the same to give a coarse, roughly broken up texture.
Peel & cut the potatoes in half while still hot. Add the vinegar & oil. Cool fro 10 minutes, then add the olive & parsley mixture. Season with salt & pepper & toss through the zest, celery leaves & remaining parsley.
Labels:
ben o'donoghue,
capers,
curtis stone,
garlic,
lemon,
olives,
parsley,
Polish,
potato,
salad,
steak,
surfing the menu,
wine
Sunday, October 01, 2006
Squashed Ginger Biscuits & a disaster!
Yesterday I slaved away all morning making some lemon meringue pies at the request of my mother. Alas they were a complete disaster & had to be dumped. The pastry was fine (even though I misread the recipe & added too much butter), the meringue tops were fine & even the filling tasted pretty good but it just didn’t set at all so a bit difficult to eat unless you like lemon meringue soup! I have a feeling that I should have cooked the filling & bit longer and allowed it to thicken more even though I already had cooked it for double the time the recipe suggested. Needless to say I am throwing out that recipe & it will be a while before I attempt these again.
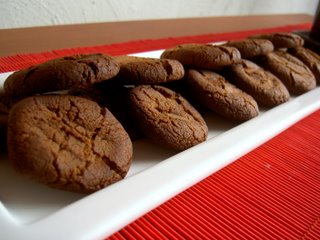
So to make up for my disaster today I whipped up a batch of very simple ginger biscuits, pretty sure the recipe is from the latest Donna Hay. They were a cinch to make & Michael loved them, they had a lovely ginger & spice flavour that wasn’t too subtle or overwhelming. My only comment would be that if you have a fan forced oven, cook them at a lower temperature & a bit shorter duration as mine were quite crunchy despite the fact the recipe states you will end up with soft biscuits. Still crunchy was good.
Squashed Ginger Biscuits
115g (1/3 cup) golden syrup
100g butter
150g (1 cup) plain flour
2 tablespoons white sugar
3 teaspoons ground ginger
1 teaspoon bicarbonate of soda
1 teaspoon each of mixed spice & ground cinnamon
Preheat oven to 220c. Combine golden syrup & butter in a saucepan & stir over low heat until butter melted. Sift remaining ingredients together in a large bowl, add golden syrup mixture & stir to combine.
Roll tablespoons of the mixture into balls and place on baking paper lined oven trays. Bake for 5 minutes then reduce heat to 180c and using a spatula, flatten biscuits & bake for another 10 minutes. Cool on a wire rack. Biscuits will keep for up to 1 week in an airtight container. Makes approx 18.
Subscribe to:
Posts (Atom)