Yesterday I was visiting my family & wanted to take along a tasty treat for all to indulge in. Flicking through my books, the usual cakes, muffins & bickies did not appeal, I felt like making something a bit different. I finally came across this recipe which was in Bill Granger's Sydney Food. I love bread & don’t mind a bit of baking so this seemed perfect, also had not made anything like this before so definitely keen to see how it would compare to shop bought delights of a similar nature. The preparation & assembly were really quite easy & not that far off making bread dough though the ingredients are a little different, the only factor you would need to consider making these is time as you have to let the dough rise twice, I found mine needed about an hour each time too & dont they look delicious even before they're cooked? Straight out of the oven & time for a quick icing & taste test, really good, the dough was quite fluffy & not too heavy or dry. The wicked flavour combination of butter, sugar, cinnamon, sultanas & currants was very evenly balanced, I find sometimes these can be too bready with not enough flavouring, no such problem with these. And the final touch of the icing really finished them off beautifully, rounding off all of the flavours. I think these would also be great with some chopped nuts though with Michael being allergic, I wont be trying that option too soon! Yum!
Iced Cinnamon Snail Rolls
Dough
2 x 7 g sachets dried yeast
¼ cup lukewarm water
1 cup milk
125g unsalted butter, cubed
4 cups plain flour
a pinch of salt
2 eggs, lightly beaten
1/3 cup currants
1/3 cup sultanas
80g unsalted butter, melted
¾ cup firmly packed brown sugar
1 tablespoon ground cinnamon
Icing
1 cup icing sugar
1 tablespoon warm water
½ teaspoon vanilla essence
To make the dough, dissolve the yeast in warm water in a small bowl. Place milk & cubed butter in a medium saucepan and heat until butter is melted. Sift flour & salt into a large mixing bowl. Add sugar & stir to combine. Make a well in the centre and add eggs, & milk & yeast mixtures. Stir until a dough forms.
Turn the dough onto a lightly floured surface & knead for 6-8 minutes, working in extra flour if too sticky. Add the currants & sultanas in the last 2 minutes of kneading. Turn the dough into a large, lightly greased bowl & cover with plastic wrap. Keep the bowl in a warm place & let the dough rise for 30 minutes to an hour until the dough has doubles in size.
Punch the dough down & turn onto a lightly floured bench. Roll it into a 23 x 60 cm rectangle. Brush generously with the melted butter, reserving some for later, and sprinkle evenly with the brown sugar & cinnamon.
Roll the dough up from the short end, swiss roll style, to make a log. Cut the roll, seam side down, into 2 cm thick slices & place on baking trays that have been lightly greased, leaving 1.5 cm between each slice. Brush the tops with the remaining butter. Cover loosely & leave to rise until doubled.
Preheat oven to 180c. Bake trolls for 20-30 minutes. Remove from the oven, allow to cool on rack for 10 minutes, drizzle with icing.
To make icing, place sugar, water & vanilla in a mixing bowl & stir until smooth. Add extra water if too thick to drizzle. Makes 12.
Monday, July 31, 2006
Sunday, July 23, 2006
Coyote Cafe, North Fitzroy
Last night Michael & I thought we would try out the new Mexican place, The Coyote Cafe that opened a few months ago on Nicholson Street in North Fitzroy. The place serves Traditional & New Wave Mexican food, it all looks very interesting though last night we stuck to the basics thinking we would be more adventurous next time. We shared a small plate of Nachos to start with, they were really good, layered pinto beans on the bottom, corn chips, lots of warm melted cheese, jalapenos & pepper sauce, all served with guacamole, salsa & sour cream on the side. I was impressed that with all the cheese the corn chips managed to stay crispy throughout which gets a big star from me. Also the serve was so big for a small that between the 2 of us we were nearly full after the starter! Next we shared the fajitas, this was a mix of char grilled beef, chicken & chorizo with onion, capsicum & Mexican rice, served with warm tortillas, salsa, sour cream, guacamole, lettuce & cheese so you can build your own tasty parcels. As we were sharing, they were kind enough to give us an extra serve of tortillas at no additional cost & we didn’t even ask for them, again it was all pretty tasty although the rice was a little overdone after sitting on the char grill plate for so long & more than enough to share. Add in a couple of coronas & the whole meal set us back under $50.00 so very kind on the hip pocket too. All in all nothing fancy, but nice for a casual meal out any time. They also do take-away & I believe on some weeknights they have margarita specials & the like too.
Coyote Café
414 Nicholson Street
North Fitzroy
9489 0077
Coyote Café
414 Nicholson Street
North Fitzroy
9489 0077
Sunday, July 16, 2006
Lemon & Lime Cream Tart
For dessert on Saturday night I totally ignored my Curry theme & made a gorgeous lemon & lime tart, I thought the tanginess of this tart would be perfect after a night of curries. The recipe comes form Jamie Oliver’s The Naked Chef. To start with you make the pastry & there is enough for 2 which is handy as next time I need a quick dessert it’s just a matter of filling the case up! I also used the food processor option which makes it so easy. I love a lemon tart & this one is pretty good, very tangy & rich though so only the smallest piece is needed & berries of any type are great on the side.
Short Crust Sweet Pastry
To make 2 x 30cm/12 inch tart moulds
250g butter
200g icing sugar
a medium pinch of salt
500g flour
4 egg yolks
4 tablespoons cold milk/water
You can make this by hand or in a food processor. Cream together the butter, sugar & salt & then rub or pulse in the flour & egg yolks. When the mix has come together, looking like coarse breadcrumbs, add the cold water or milk. Pat & gently work together to form a ball of dough. Use minimum movement as the more you work it the more elastic it will get, causing the pastry to shrink & be chewy. Roll into a large, short & fat sausage shape, wrap in glad wrap & place in the fridge for at lest 1 hour.
Carefully slice off thin slivers of pastry lengthways, around 5mm thick. Place the slivers in & around the bottom & sides of your tart mould, then push the pieces together & level out. Now it needs to rest again for at least 1 hour in the freezer this time.
Bake the tart for about 15 minutes at 180c, completely cool & fill with any uncooked fillings.
For baked fillings, bake blind first at 180c for only about 12 minutes. You can fill the shell with rice, baking beads, etc but if your pastry is straight out of the freezer you shouldn’t have problems with shrinkage, etc.
Lemon & Lime Cream Tart
1 tart shell, baked blind (For his tart egg wash before blind baking!!!)
340g caster sugar
8 large eggs
350ml double cream
200ml lime juice
100ml lemon juice
Egg wash your tart shell, then blind bake. This will keep the pastry crisp for longer.
Whisk together the sugar & eggs. When mixed well, slowly stir in the cream, lemon & lime juices. Put the shell back in the oven & slowly pour in the filling (this will reduce spillage). Bake for around 40-45 minutes at 180c or until the filling is set but semi wobbly in the middle. After cooling for an hour the filling will have firmed up. Don’t cut any earlier or it will be gooey & ooze out. If preferred dust with icing sugar to serve. Serve with fresh berries.
Tags: lemon, lime, tart, recipe
Curry Night
Last night I had a few people over for dinner & decided to do another curry night. I started off with some vegetarian samosas which I didn’t think were that good, they were a bit on the oily side so I have skipped the recipe. For the Main course we had some curries, rice dishes, rotti & raita. I used Jamie Oliver’s favourite curry sauce from Happy Days which I’ve made heaps of times before, I love it, the flavours are very fresh & it can be used many ways which came in handy as one of the guests tonight only eats fish, so I doubled the recipe, then split the sauce in half & did half chicken, half fish. The Lemon Rice is from this book also & really is worth that little extra effort over plain steamed rice, it’s absolutely delicious. This is the first time I am making it with the urad dhal as I finally found some at my local Asian grocer, it added a lovely crunchy texture to the rice The raita was a simple mix of yoghurt, grated cucumber & toasted cumin seeds and the Rotti I picked up form the local deli.
Curry Sauce
5 tablespoons vegetable oil
2 teaspoons mustard seeds
1 teaspoon fenugreek seeds
3 fresh green chillies, deseeded & thinly sliced
1 handful of curry leaves
2 thumb size pieces of fresh ginger, peeled & coarsely grated
3 onions, peeled & chopped
1 teaspoon chilli powder
1 teaspoon turmeric
6 tomatoes, chopped
1 x 400ml coconut milk
salt
For the fish version
225g white fish fillets
1 knob tamarind paste or 1 teaspoon tamarind syrup
baby spinach
handful fresh coriander, chopped
For the chicken version
4 chicken breasts, sliced into 1cm strips
1 tablespoon coriander seeds, crushed
Heat the oil in a pan, and when hot add the mustard sees. Wait for them to pop, then add the fenugreek seeds, fresh green chillies, curry leaves & ginger. Stir & fry for a few minutes. Using a food processor, chop the onions & add to the pan. Continue to cook for a few minutes until the onion is light brown & soft, then add the chilli powder & turmeric. Using the same food processor, pulse the tomatoes & add to the pan. Cook for a couple of minutes, then add 1 or 2 wineglasses of water & the coconut milk. Simmer for about 5 minutes until it has the consistency of double cream, then season carefully with salt.
Ok so now I am splitting the sauce in two. For the fish verion, add the fish & tamarind & simmer for 6 minutes. Add some baby spinach & coriander at the end.
For the chicken version, stir fry the chicken strips & coriander seeds until lightly browned, then add to the sauce & simmer for about 10 minutes.
Lemon Rice
455g basmati rice
5 tablespoons vegetable oil
2 tablespoons mustard seeds
2 teaspoons urad dhal (small dried split peas)
1 handful of curry leaves
rind & juice of 2 lemons
fresh coriander, chopped
sea salt & freshly ground black pepper
Thrown the rice into boiling water, cook for 10 minutes & drain.
Heat the oil in a small frying pan, over medium heat. Add the mustard seeds & as they begin to pop add the urad dhal, curry leaves & strips of lemon rind. Leave to cook for 1 minute until the urad dhal & lemon peel are lightly coloured.
Add the drained rice to a bowl & pur over the cooked spices, lemon juice & chopped coriander. Season to taste.
Friday, July 14, 2006
Marinated & Pot roasted beef fillet with a brilliant potato and horseradish cake
Well I’m finally getting around to telling you about the main course content of Wednesday nights feast. The following recipe comes from Jamie Oliver Jamie’s Kitchen. The beef was sensational, all of the juices & herbs soaked through to give it a lovely flavour & kept it nice & moist & tender despite the fact that I discovered I had no garlic to use & substituted with onions! The potato bake was ok, I wasn’t overly impressed, Michael loved it though. I didn’t think the flavours came together all that well & it was a bit dry, I would definitely make the meat again but probably serve with mash instead.
Marinated & Pot roasted beef fillet with a brilliant potato and horseradish cake
1 x 900g whole fillet of beef, trimmed
sea salt & freshly ground black pepper
2 handfuls of fresh rosemary sprigs
1 bulb of garlic, broken up, cloves left whole with skins on
extra virgin olive oil
2kg desiree or Maris piper potatoes, peeled & sliced 0.5cm thick
3 heaped tablespoons creamed horseradish
½ bottle of red wine
170g butter
Generously season the beef with salt & pepper. In a pestle & mortar bash up about a quarter of the rosemary with a clove of garlic to make a paste. Lossen with 5 tablespoons of olive oil & then rub this all over the beef. Tie the beef with 4 pieces of string then poke the remaining rosemary sprigs under the string.
Preheat oven to 250c. Parboil the potatoes in boiling salted water for 5 minutes & drain in a colander. Transfer to a bowl & add enough olive oil to just coat, season well. You can make this in a non stick cake tin or oven proof non stick frying pan or make small individual ones. Place half the potatoes in the pan then smear the horseradish cream over the top & place the rest of the potatoes on top, pat down & put to the side.
Brown off the meat in a snug fitting roasting tray until all sides are coloured. Add the garlic cloves to the tray, place the beef on top & put on the oven with the potatoes on the shelf below. Cook fro 20 minutes, then turn the beef over, baste, add the red wine & butter & place back in the oven for another 15-20 minutes or until cooked to your liking. When ready, rest the beef for a few minutes, then cut off the string & carve. Return any juices to the pan , mush up the garlic & put through a sive & use this sauce as your gravy. Serve with the baked potaotes
Weekend Breakfast blogging
Nandita at Saffron trail has started a fortnightly event called weekend breakfast blogging
I thought I would remind you all of a wonderful Christmas breakfast I made last year that I truly reccomend you all try, here it is again
Sweetcorn & Ricotta hotcakes with smoked salmon & basil dressing
To use up some more of my smoked salmon I cooked up a treat for Michael & I on Christmas morning, we were not expecting the whole family over until dinner time so wanted something nice to start the day.After doing the Allan Campion cooking class at Vic Market & him making it look so easy I thought I would try this recipe out for myself. Again it was really easy & have heaps of leftover hotcakes to have for brekky over the next few days. Think the corn & smoked salmon teamed with the basil is a great combination too.The recipe is from 2006 Seasonal Prodcue Diary, here it is
Sweetcorn and ricotta hotcakes with smoked salmon and basil dressing
1 cup basil leaves
1 garlic clove, peeled & sliced
120-160 ml (1/2 - 2/3 cup) olive oil
salt & freshly ground pepper
2 medium eggs
250g ricotta
60 ml (1/4 cup) milk
125g (1/2 cup) natural yoghurt
150g (1 cup) self raising flour
1/2 tspn baking powder
1/2 tspn salt
2 corn cobs
olive oil for cooking
rocket to serve
12 slices smoked salmon
Place basil & garlic in food processor & blend until chopped. Slowly add the olive oil until the basil is pureed & forms a thickish sauce. Season with salt & pepper & set aside.Beat eggs & ricotta. Add milk and yoghurt & beat until smooth. Sift flour with baking powder and salt & add to ricotta base, stir until combined.Remove husks and silky tassells from corn. Run a sharp knife down each cob to remove the kernels. Stir kernels through pancake mixture.Heat a heavy based pan over medium heat. Add a splash of oil to hot pan, then a few ladlefuls of ricotta mixture. Mixture should spread to abt 6 cm wide. Cook until bubbles form on top & base is golden brown. Turn over & cook for a further 2-3 minutes. Keep warm until all hotcakes are cooked.Place one hotcake on each plate, add a handful of rocket, place another cake on top. Add more rocket & arrange 2 slices of salmon on top. Repeat with remaining hotcakes. Drizzle basil oil around hotcakes & serve immediatleyPS - As you can see from the photo I didnt do the fancy arrangement just for the 2 of us!
Wednesday, July 12, 2006
Molten Chocolate Puddings
Last night my good friend Megan came over for dinner & I’m skipping straight to dessert which was pretty bloody good & so easy it wasn’t funny. You even get to prepare the whole thing in advance so after dinner you just have to pop them in the oven & 20 minutes later like magic you have a pot full of hot gooey chocolate bliss, very highly recommended. The recipe comes from Allan Campion & Michele Curtis’ Food with Friends which hasn’t let me down yet
Molten Chocolate Puddings
350g dark chocolate, chopped into chunks
50g soft butter
150g caster sugar
4 medium eggs, lightly beaten
2 tablespoons plain flour
cream to serve
6 x 125ml ramekins
Grease 6 x 125ml ramekins & place on a baking tray. Put chocolate in a heatproof bowl & set over a saucepan of simmering water until it has melted. Beat butter & sugar until light & fluffy. With the mixer still going, gradually add the beaten eggs. Add the flour & ensure all ingredients are well combined. Add chocolate & beat to a smooth paste. Divide mixture between ramekins. You can set these aside at this point if leaving until later.
Preheat oven to 180c. Place tray with ramekins in the oven & cook fro 18-20 minutes. Check puddings by inserting a skewer: you want them to be gooey in the middle, but cooked at least 1 cm inside from the edge. Serve straight from the oven with cream.
Tuesday, July 11, 2006
Steamed Fish Fillets with Ginger & Spring Onions
Tonight was Michael’s cooking night for the week & he chose this simple recipe from Kylie Kwong’s Simple Chinese Cooking. As Kylie says it’s healthy, light & very clean tasting.
Steamed Fish Fillets with Ginger & Spring Onions
4 x 100g Firm white fleshed fish
1/3 cup water
2 tablespoons shao hsing wine or dry sherry
2 tablespoons ginger julienne
1 Chinese cabbage leaf
½ teaspoon white sugar
2 tablespoons light soy sauce
¼ teaspoon sesame oil
½ cup spring onion, julienne
1 ½ tablespoons peanut oil
¼ coriander leaves
pinch ground white pepper
Place fish in a shallow heatproof bowl that will fit inside a steamer basket. Pour water & wine/sherry over fish, then sprinkle with half the ginger. Place bowl inside steamer & place over pot of boiling water & steam covered for 5-6 minutes.
Cut Chinese cabbage leaf into 4 squares & slip inside steamer. Cover & steam for a further 2-3 minutes or until fish is just cooked.
Remove cabbage from steamer & arrange on serving plates. Place the fish on top of the cabbage. Pour any liquid left in the bowl over the fish, sprinkle with sugar & drizzle with combined soy sauce & sesame oil, then sprinkle remaining ginger & half the spring onion. Heat peanut oil in a small frying pan until moderately hot then pour over the fish. Sprinkle with remaining spring onion, coriander & pepper.
Sunday, July 09, 2006
Choc-Orange cupcakes with orange whipped icing
Sunday I had an urge to bake & the flavour required was choc orange. After searching through a few cookbooks & my folder of magazine cut outs I finally found this recipe for choc orange cupcakes from a recent Donna Hay magazine. I have to say the cake mixture was delicious so was off to a promising start. I was however a bit worried about the icing as I have never used this method before & as I was beating it didn’t know when to stop, ie how thick would it get? It was still quite runny but spreadable when I figured nothing much else was going to happen so I spread away keeping my fingers crossed that it was harden up after a while. On tasting the cake part was delicious & the topping of crushed jaffas gave it some lovely orangey crunch, also the tangy icing was a great offset to the chocolate cakes & it did harden up a little though not rock hard. So all in all pretty yum
Choc-Orange cupcakes with orange whipped icing
250g butter, softened
1 /4 cups caster sugar
4 eggs
2 ¼ cups plain flour
2 teaspoons baking powder
1/3 cup cocoa powder
1 cup milk
200g dark chocolate, melted
1 cup chocolate orange balls, roughly chopped
Orange whipped icing
1 cup caster sugar
¼ orange juice
¼ teaspoon cream of tartar
2 ½ tablespoons orange flavoured liqueur
3 eggwhites
Preheat oven to 160c. Place butter & sugar in the bowl of an electric mixer & beat until light & creamy. Gradually add the eggs & beat well. Sift over the flour, baking powder & cocoa & beat until combined. Fold through the milk, stir in the melted chocolate & spoon into 2 12 hole ½ cup capacity tins lined with patty cases. Top each cake with crushed choc orange balls & bake for 15-20 minutes or until cooked when tested with a skewer. Cool on wire racks.
To make the icing, place the sugar, orange juice, cream or tartar & liqueur in a saucepan over high heat & stir until the sugar is dissolved. Bring to the boil, reduce the heat to low & simmer for 3 minutes. Place the egg whites in an electric mixer & beat until soft peaks form. While the motor is running, gradually add the sugar mixture & beat until thick & glossy. Spread the icing over the cupcakes with a palette knife. Makes 24.
Saturday, July 08, 2006
Iliana Pizza
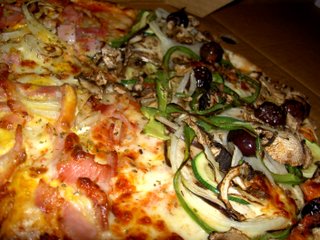
Normally I wouldn’t do a post on take away pizza so this is an exception. I thought I just had to let everyone know that the best take away pizza in Brunswick comes from Iliana on Nicholson street. They have a great thin crispy base & the toppings are perfect, never overdone & they even use real ham, pretty amazing stuff wouldn’t you say? Last night I ordered half Aussie & half vegetarian, this way I can fool myself into believing I am eating healthy food. I don’t normally go for Aussie but theirs is suberb, lovely chunks of just crispy bacon & the egg gets right in there, its sensational. As for the veggie, you can prob see its topped full of onions, zucchini, mushies, capsicum & olives as well as the usual tomato & cheese. They also have a range of Gourmet pizzas as well as pasta (pretty good too) & even some burgers & fish & stuff, have never strayed that far form the pizza or occasional pasta myself. Anyway if you live in the area make this your local, you won’t be sorry!
Iliana
128 Nicholson Street
East Brunswick
9381 0404
Wednesday, July 05, 2006
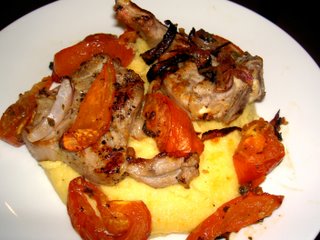
Veal Cutlets with Tomatoes, Capers & Polenta
Michael has been taking on the task of cooking a meal a week for me these days & this week he chose this great recipe form Bill’s Food. We didn’t use Bills method of making the polenta as it need 1.5 hours & who has that kind of spare time after work? Instead he made the cheesy Polenta from Allan Campions Food with Friends that we have made before. Great dish, love polenta & looovvve it when someone else cooks for me for change!
Veal Cutlets with Tomatoes, Capers & Polenta
4 large rip tomatoes, each cut into 8 wedges
1 tablespoon fresh oregano leaves
2 tablespoons capers, rinsed & squeezed dry
2 garlic cloves, sliced
1 red onion, cut into fine wedges
2 tablespoons olive oil
sea salt
freshly ground black pepper
4 veal cutlets
Polenta to serve
Preheat oven to 200c. Put the tomatoes, oregano, capers, garlic & olive oil in a small roasting pan & toss together. Sprinkle with salt & pepper. Cover with foil & bake for 25 to 30 minutes. Remove the foil & bake for another 10 minutes.
While the tomatoes are cooking, brush the cutlets with oil & season liberally with salt & pepper. Heat a large frying pan over high heat for 1 – 2 minutes until very hot. Add the veal & cook for 1 minute on each side, or until sealed. Remove from the pan & place on top of the tomatoes & bake for 10 – 15 minutes until veal is cooked. Serve with polenta.
Monday, July 03, 2006
Chicken breast Baked in a bag with Mushrooms, Butter, White wine & thyme.
This is a great winter dish that takes no time at all. Seriously it takes 5 minutes to gather & prepare the ingredients & then you just pop it into the oven to cook for a while. I like to serve with Mash potato so you can soak up all of the deliciously wicked juices formed from the butter, wine, garlic & thyme. Also I skipped the porcini as didn’t have any handy. Lovely comfort food. The recipe comes form Jamie Oliver’s Happy Days with the Naked Chef
Chicken breast Baked in a bag with Mushrooms, Butter, White wine & thyme.
2 x 200g skinless chicken breasts
1 handful of dried porcini
250g mixed mushrooms, torn up
1 large wineglass of white wine
3 large knobs of butter
1 handful of fresh thyme
2 cloves of garlic, peeled & sliced
Preheat oven to 220c. Using foil, places 2 pieces n top of each other, about the size of a shoe box, fold 3 sides over leaving one open. Mix everything together in a bowl & place it all, liquid included in the bag, taking care not to pierce the foil. Seal the remaining edge, place on a baking tray & bake for 25 minutes. When opening the bag after cooking, be careful as a lot of hot steam will escape & you don’t want to burn yourself.
Rocket & Leek Frittata
This recipe was published in the Weekend Australian back in August 2005 & I have finally got around to trying it out for lunch today with Rach. I wanted something fairly simple & light for lunch & this seemed the perfect dish. So simple its not funny & really very tasty, nice & cheesy
Rocket & Leek Frittata
2 tablespoons Olive Oil
3 rashers bacon, chopped
3 leeks, washed & thinly sliced
6 eggs
150ml cream
salt & freshly ground black pepper
Handful of grated cheddar
Handful of rocket
Preheat oven to 180c
Heat 2 tablespoons olive oil in a large non stick, oven proof frying pan over medium heat. Add the bacon & leeks & cook for 5 minutes or until leeks have softened. Combine eggs & cream, season with salt & pepper. Pour the eggs into the frying pan & swirl the mixture a little. Stir through a handful of grated cheddar & a handful of rocket.
Transfer to oven & cook for about 20 minutes or until set, golden & puffed up a little. Serve straight from the pan or invert onto a large flat plate, warm or at room temperature.
Sunday, July 02, 2006
The Brandon, Carlton – Dad’s Birthday celebrations
My Mum & Dad had thought about it for ages & just couldn’t agree on anywhere to go for his birthday dinner. I have been wanting to try out The Brandon Hotel dining Room for ages & after seeing a write up in my local weekly magazine talking it up & mentioning it was the 3AW pub restaurant of the year I knew I could talk them into it, they love 3AW! I also knew that when they saw the menu they would be complaining that it was all too fancy, by the time I got them there it was too late & they were stuck with it & I managed to explain the choices in plain English with them & stopped them from moving into the public bar for a parma & chips.
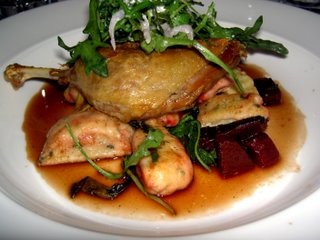
I settled on the duck special of the day which was a crispy skinned duck leg confit on potato parsley with a fennel, rocket & artichoke salad & some roasted beetroot. I also convinced my mum to have this, she hasn’t been impressed with duck in the past so I told her to trust me, if it’s cooked well it’s delicious. Myself I tried very hard not to order the duck as I always end up with duck but I love it so much I just couldn’t resist, it was delicious too & my mum loved it as well. As you would expect the meat was falling off the bone & it had a lovely rich flavour, the salad was nice & fresh & perfect alongside the powerful duck flavours & the gnocchi great to mop it all up with. My dad had the steak with polenta which was very nice but he was a bit disappointed in the size, being much more used to huge servings, it was really perfect though as it didn’t spoil his appetite for the cake afterwards! Rob, my brother had the pot roasted chicken with pea puree which he declared absolutely excellent too. Lastly Michael had the chermoula lamb rump which he says was cooked very well (nice & pink inside) & overall was very impressed.
A great pub dining room with a lovely atmosphere, the tables are well spaced, lovely art work on the walls, a warm fireplace, very attentive & knowledgeable staff, all in all a very inviting place which I will be back to one day for more.
The Brandon Hotel
237 Station Street
Carlton
9347 232
Chocolate-Coffee Volcano
For my Dads birthday I decided to make him this impressive sounding Chocolate-Coffee Volcano from Nigella Lawson’s Domestic Goddess – my first recipe from the book. The thing I liked about this recipe was that I could make the cake & prepare the cream & have it sitting & waiting just to throw together at the last minute. Also I used Kahlua instead of Tia Maria as that’s what I had in the bar! The cake was very moist & very chocolatey due to all of the cocoa, great tasting cake. The addition of the walnuts, crème, & caramelised sugar brought it up another level & made it that bit more special. As for the ‘look’, well I think I missed the volcano effect a bit as when I put the crème in the middle straight from the fridge there was no running over the edges like molten lava so mine was just a volcano on the brink! I think this is a great combination of flavours & everyone who had a piece loved it.
Chocolate-Coffee Volcano
Cake
300g Caster sugar
140g plain flour, sifted
80g cocoa powder
2 teaspoons baking powder
1 teaspoon bicarbonate of soda
¼ teaspoon salt
4 large eggs, separated, plus 2 more egg whites (from the yolks you need for the café cream)
125ml vegetable oil
125ml water
1 teaspoon vamilla extract
25cm bundt tin, oiled
Café Cream
225ml double cream
6 large egg yolks
3 tablespoons light muscovado sugar
1 tablespoon instant espresso powder
Topping
4 tablespoons Tia Maria or rum (or Kahlua)
125g chopped walnuts
4 tablespoons Demerara sugar
Chef’s kitchen blowtorch
If making to serve right away then make the custard first so it has a good chance to cool before use. Warm the cream gently in a saucepan. Mix the egg yolks, sugar & espresso powder together in a bowl & pour the warm cream over this mixture, whisking to combine/ Pour the mixture back into the now rinsed out pan & cook over medium heat, stirring constantly until it thickens. Pour into a bowl & leave to cool.
Now for the cake. Preheat oven to 180c. In a large bowl mix together 200g of the caster sugar, flour, cocoa, baking powder, bicarb & salt. In a measuring jug, whisk together the yolks, oil, water & vanilla. Pour over the dry ingredients gradually, beating to combine.
In another bowl, whisk the 6 egg whites until they are foamy & forming soft peaks. Add the remaining caster sugar, a spoonful at a time, still whisking until the whies are thick & shiny & hold their shape. Briskly beat a large dollop of whites into the cake mixture to lighten it, then a third at a time, fold in the remaining whites.
Pour the mixture into the oiled tin & bake for 40 minutes, the cake should then be springy & coming away from the sides. Let the cake cool in its tin on a rack for 25 minutes before turning out.
Sprinkle the Kahlua onto the cake 1 teaspoon at a time, letting the liqueur soak in after each spoon full.
When ready to serve, place the cake on a plate with a lip & fill the centre with walnuts. Pour in the cold custard letting it overflow a bit onto the shoulders & over the sides. Sprinkle the Demerara sugar, a little at a time, so that it doesn’t soak in, on top of the cake, & use a blowtorch to caramelise the top.